Tuesday, December 31, 2013

2013 Recap

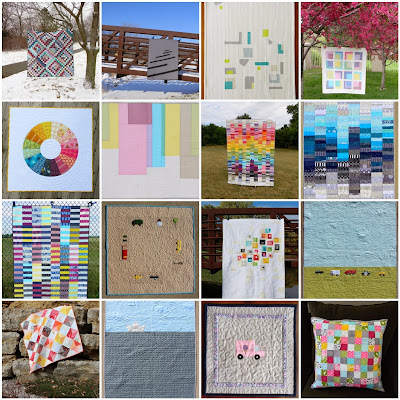
Wow, 2013 has been quite a year for me with quilting: so many exciting opportunities and so much hard work.  Here is a recap of projects I have shared with you over the past year.  Thanks to everyone who has stopped by my blog to read or look at pictures.  A huge thank you to those of you who regularly read and leave encouraging comments.  I appreciate it so much!


1. scrappy trip along quilt, 2. Horizon, 3. Fractions Mini Quilt, 4. Spring Quarter Quilt, 5. voile color wheel quilt, 6. On the Line, 7. The Therapist, 8. Partly Cloudy, 9. Rugby Stripe Quilt, 10. Busy City Wall Hanging, 11. Tiny Log Cabin Quilt, 12. Busy City baby quilt, 13. A Quilt for Fall, 14. paper boat baby quilt, 15. Icecream Truck Pillow, quilted cover, 16. patchwork pillow

Most of what I made in 2013 will have to remain under wraps until next year.  I am excited to share it as soon as I can.  I hope you will stop back by in 2014 to see.  Happy New Year!

Monday, December 30, 2013

Paper Boat Baby Quilt

I have made several versions of my paper boat quilt: a mini quilt, a baby quilt with improvisation and reverse applique, and even a standardized mini one for a pattern.  Each quilt features the same basic paper pieced block, just in different sizes.  I have had several requests to make the pattern in a baby quilt size, so when a nice client on etsy asked me to make a custom baby-sized version, I decided to do both at once.
I worried a baby-sized version might seem too minimal, but I think the solitude of the boat on the ocean is peaceful.  The quilting also adds a lot to the negative space.  I hope the quilt will be just the right touch for her nursery.
 
The new, updated pattern includes both the previous mini quilt instructions and paper pieced templates, as well as the instructions to make this 38" x 46" quilt and the templates for its 6" x 9" paper boat block.  I recommend the pattern for those with a basic knowledge of paper piecing.  There are some great tutorials online on paper piecing (also, all patterns with paper piecing by Empty Bobbin Sewing include such instructions, including my pattern Busy City - end of self promotion). The paper pieced templates go together with a gentle y seam, but trust me, it's easy.
 
You can find the new pattern in my etsy shop, and it is available for instant download.  How great is that? As always, I would love to see what you make. You can email me, tag me on instagram (@teaginny) or add your pictures to my flickr group.
Back soon with a year end wrap up.

Tuesday, December 3, 2013

It's Still Fall, Right?

I finished up my quilt for Fall over the holiday weekend. Technically, it is still autumn until December 20th, so I'm calling it a win.  I'm sure it won't be the last quilt that doesn't get done as quickly as I'd hoped.
The weather is about to turn really cold here, so I snapped some quick pictures while the sun was out today.
I quilted straight lines on either side of the main diagonal seams to prevent shifting during the simple free motion, dot to dot design I quilted in each diamond.
It creates an interesting texture on the back of the quilt. The flannel back is going to be so cozy.  I found this Timeless Treasures crosshatch flannel on a super sale, and I've heard great things about how it washes.
The binding is an orange hounds tooth by Denyse Schmidt.
 
Now that it has been documented, this 60" x 60" quilt is ready for use on the couch...next to the Christmas tree.  Oh well.  Maybe I'd better start, now, on a Christmas quilt for next year.

Sunday, November 24, 2013

My First Maquette

I first heard the term maquette, or an exploratory, small scale version of an intended larger piece, on Jacquie's blog.  (One of many, many invaluable tips I've gleaned from her!)  I was intrigued by the technique but honestly too impatient to give it a try. I usually just dive head first into a new design, with almost no preliminary plans or calculations.  As you might imagine, this can occasionally lead to regret later on. Still, it is how I work most often, and usually I find complications to be opportunities to improvise.
There are certain designs which require a bit more forethought, however.  This piece of art, Light House by an Australian artist with an etsy shop called pool pony, was the inspiration for my first attempt at making a maquette.  I could see that making the curves and intersecting lines match up would be a challenge, as well as the way the colors seem to overlap.  I still improvised the piecing, but through the process of making the maquette, I learned so much. 
For example, when I make a larger version, there are different ways I'd like to arrange the colors to play up some overlap and create the illusion of transparency.  I will also change the proportions of some of the shapes, and I'd like to expand the design to include some repetition of the shapes.  I may change the way I cut the curves too, but I will definitely hope to use Oakshott cottons again.  The subtlety of the colors is just perfect for creating transparency.
A piece like this is quite a challenge to make improvisationally, and it is just the type of design that really benefits from a maquette.

Friday, November 8, 2013

A Quilt for Fall

The fall colors have been beautiful here in the Midwest the past week or two.  They inspired me to make a quilt in orange, red, yellow and brown, so I pulled a bunch of fabrics from my scrap bins.  I cut them to 7 1/2 inches square.
Inspired by this gorgeous value quilt by Krista, I paired each square with a warm, low volume print cut to the same size and made half square triangles (HSTs).
As an aside, if you are going to make a HST quilt, I really recommend a bloc loc ruler (it has a groove on the underside which butts up against your center seam, keeping it perfectly in place as you trim) and rotating cutting mat.  You do need to press your seams to one side to use this type of ruler, but boy is useful.  They come in a variety of sizes too (I bought mine from the Fat Quarter Shop and am, sadly, getting no kick backs from anyone for this plug).  Trimming HSTs makes each block perfect and easy to sew into a quilt top.  The ruler I used was 6 1/2" and my HST squares finished at 6".

I finished piecing the top this afternoon, which happens to be a perfect, windy autumn day.
I have some soft flannel for a cozy backing fabric.  I just hope I get a chance to finish this quilt before fall flies by. 

Friday, November 1, 2013

Busy City Baby Quilt

I just finished up this Busy City baby quilt.  I made it to be a shop sample. With just five bocks, it really is very quick to make.  You can customize the quilt by choosing which five, of the 35 total blocks, you want to use.
I experimented with using small scale, tone on tone prints, instead of all solids.  I like the texture the grass print adds to the quilt.  And look at the cute little star on the police car!
I had some fun with the quilting, which I did free motion. The negative space in this pattern gives you some room to play.
I'm seeing Busy City patterns pop up in more and more shops.  You can now find it at and i don't do dishes on etsy and coming soon to Marmalade and Shop Cucire.  It is still available at Pink Chalk, Hyggeligt and our local stores Bernina on Metcalf and Sarah's in Lawrence.  Feel free to ask for Empty Bobbin patterns at your local quilt shop, if they don't already carry them.

Update: Busy City is now available as a digital download.  Purchase the PDF from Empty Bobbin here.

Tuesday, October 29, 2013

Apron in an Hour Remix

Jona's Apron in an Hour tutorial has been on my to do list for ages, and I finally had the opportunity to move it to the top of the list this week. I needed a hostess gift, and this is perfect! The pattern is great because it just uses a fat quarter and a half yard of fabric. I did make a simple change though. I added another fat quarter and made it reversible!


Here's a quick how to:
Square up your fat quarters to the same size (18 x 21). Sew the fat quarters along their 21" side to either side of the bottom trim fabric which is 6 x 21.Press the seams towards the fat quarters and top stitch.

Fold the rectangle in half, right sides together, so the fat quarters meet at the top, and stitch along the two sides, leaving the top open for turning.

Turn right side out and press. Now you're ready to add the apron tie, and you can follow Jona's instructions.

You get a simple, quick project that is two aprons in one!

I used a print from Amy Butler's Love, the new DS Quilts dot, and a pink crossweave.

Thursday, October 24, 2013

Tiny Log Cabin Quilt

Making this quilt was all about being in my happy place: scraps, improv, negative space, asymmetry.  The process took quite a bit of time.  There was lots of arranging and rearranging on the design wall, lots of trimming and adding strips here and there, and some time with the seam ripper.  Even the negative space is pieced improvisationally, using scraps.  This kind of process is relaxing to me, almost meditative. I made this quilt for myself, exactly the way it pleased me, and I love how it came out.
The quilting is a simple spiral using a walking foot, and I love the depth it adds to the quilt.  I placed the center of the spiral in the midst of the cluster of log cabin blocks.  It radiates outward, throwing out blocks along its path.
 
 
I picked a light blue and white DS Quilts print for the binding to keep the attention on the center of the quilt.

I was so happy to have a beautiful, sunny autumn day to take some pictures of this lovely quilt.  I'm looking forward to the day when my boys will be big enough to be quilt holders for me.  I'm prepping them now for photo shoots around town.  For now clips and trees play heavily.  It works.

Saturday, October 19, 2013

Tiny Log Cabin Blocks

I have another scrap project in the works.  Ever since I made my first tickertape quilt (pattern in Sunday Morning Quilts), I've saved even my tiniest scraps.  These bits are too small to be cut into 2 1/2" squares or two short to be thrown into my strips bins.  I have even been known to rescue scraps from my friends' trash piles at sewing meet ups.  It's a sickness, really.  But look how pretty they are!
Over the summer I started sewing these pieces into monochromatic, improv log cabin blocks.  I made a couple here and there while working on other things.  I've tagged them #tinylogcabinblocks on Instagram if you'd like to see more of a history of the project.  Each block is about 3" - 5" on a given side.  Some are rectangles, but most ended up more or less square.
The puzzle appeared as I put them on the design wall and thought of how to make them into a quilt.  I ended up improvising that part too.  I've used my neutral scraps to build the top.  It's great to use up all those random pieces of white and cream that don't seem to match any of your remaining yardage.
I'm quilting the top now.  Back soon.

Saturday, October 5, 2013

Busy City Wall Hanging

I finally finished the Busy City wall hanging for my younger son.  He is pretty excited to have it in his room.

You may have guessed his favorite part: the garbage truck on its way to collect the trash from the bins at the house around the corner.
The wall hanging finishes at 32" x 32" and uses any nine blocks of your choice from the Busy City Quilt pattern.  You can download a free construction diagram of this wall hanging with finished measurements for each piece.  Of course, you will need a copy of the Busy City pattern for the paper pieced blocks. 

Update: Busy City is now available as a digital download. Purchase the PDF from Empty Bobbin here.
As always, I would love to see what you make!  You can add your pictures to the Flickr Group or hash tag them #busycityquilt on Instagram.  Or, email me, and I may share your quilt here on the blog.

Wednesday, September 25, 2013

New Neighbors

My little neighborhood from the Busy City Quit pattern has gone up pretty quickly.  The wall hanging pattern I am going to share soon uses just nine blocks of your choice.
My son requested these blocks from the 35 blocks in the pattern.  You see he was sure to include a garbage truck to pick up the trash from the bins I already created.
I'm looking forward to sewing these together and sharing the free wall hanging pattern soon.  In the meantime, I'd love to see your blocks.  Tag #busycityquilt on Instagram or add them to the Flickr group.


Update: Busy City is now available as a digital download.  Purchase the PDF from Empty Bobbin here.